Instrument and GPS Support
|
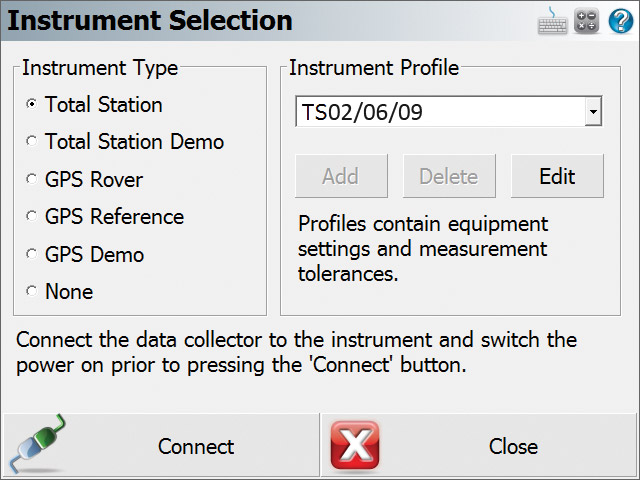
Instrument Selection FieldGenius has a central location to access settings for your Total Station and GPS equipment. Easy to use menus help you configure your equipment easily without any guess work. Not sure which settings to use? Just press the Help button for access to our comprehensive on-board help system. |
 |
|
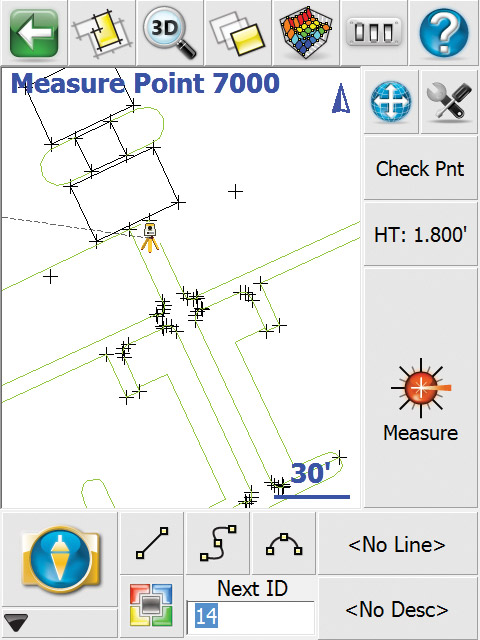
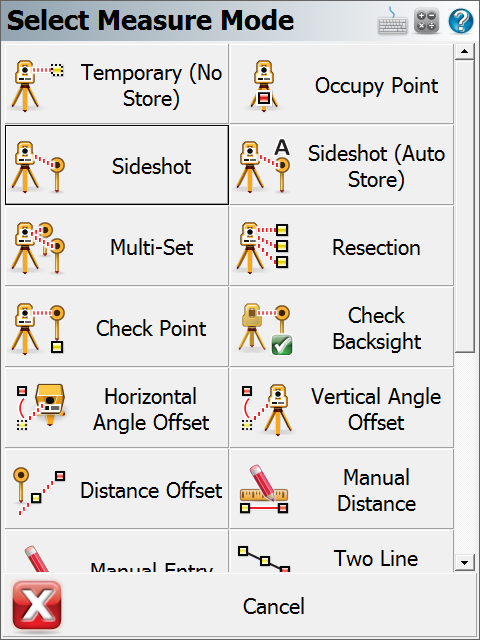
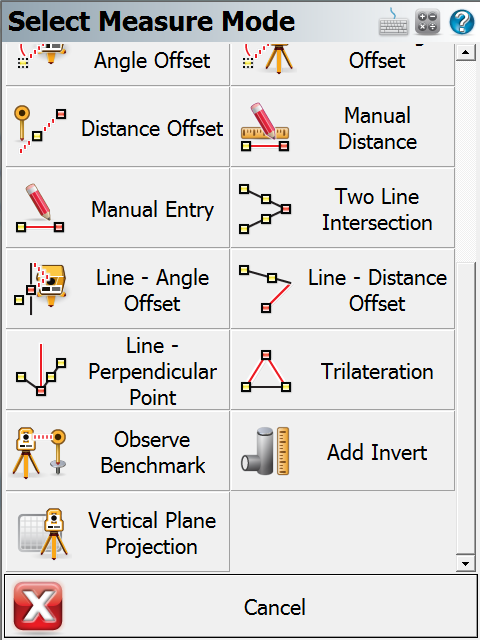
Total Station and GPS Toolbars When connected to a total station you will have easy access to all your options for your instrument. These options appear on the instrument toolbar which is currently displayed on the right hand side of the screen. On this toolbar, you can change your instrument settings, target height and measurement modes. |
 |
|
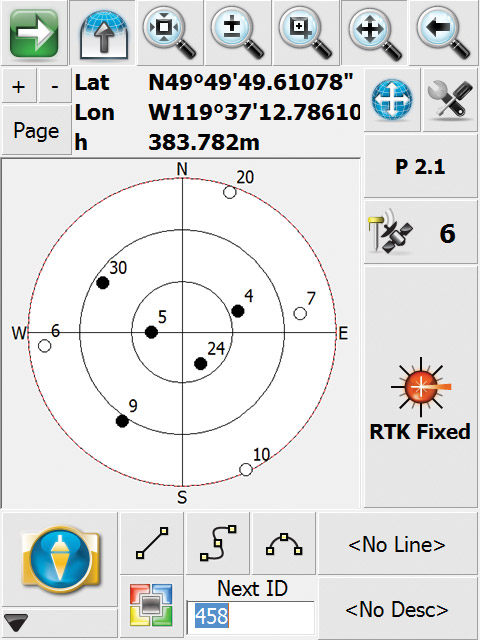
Similar to the total station toolbar, once you’re connected to a GPS receiver you will see a toolbar with GPS related options. The GPS toolbar displays to you the current satellite status, sky plot, PDOP values and more. |
 |
|
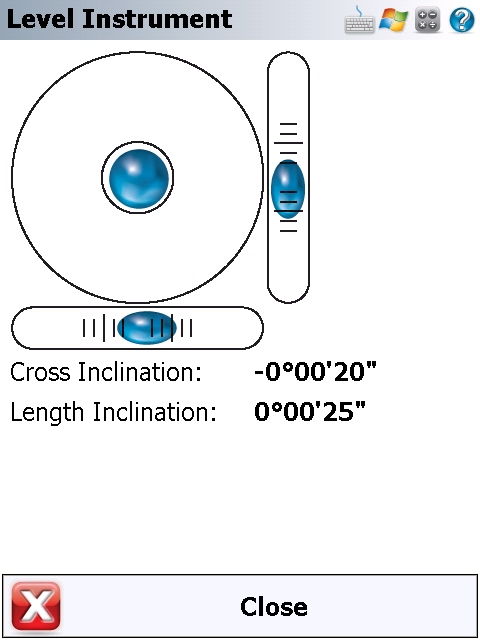
Advanced instrument control ensures that you’re maximizing your productivity by using advanced features on your instrument. (Image from Tracker while connected to Leica Robotic Instrument. This allows you to check the instrument for level while at the pole) Robotic Movies here… |
 |
Powerful Road Module
|
||||||||||||||
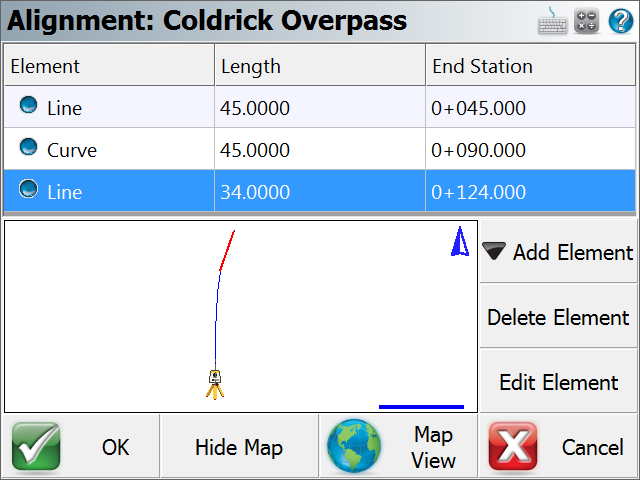
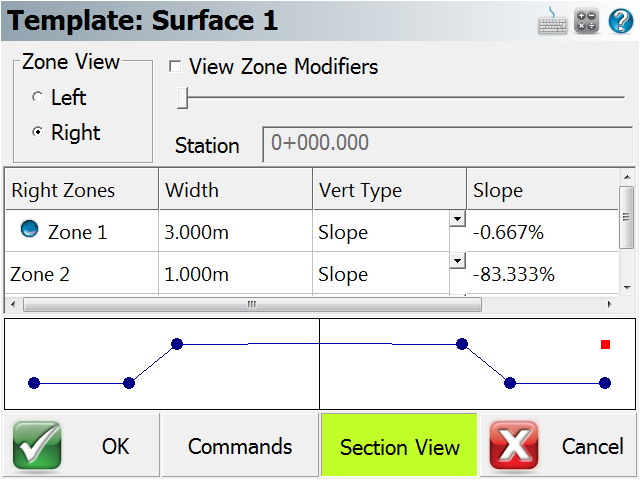
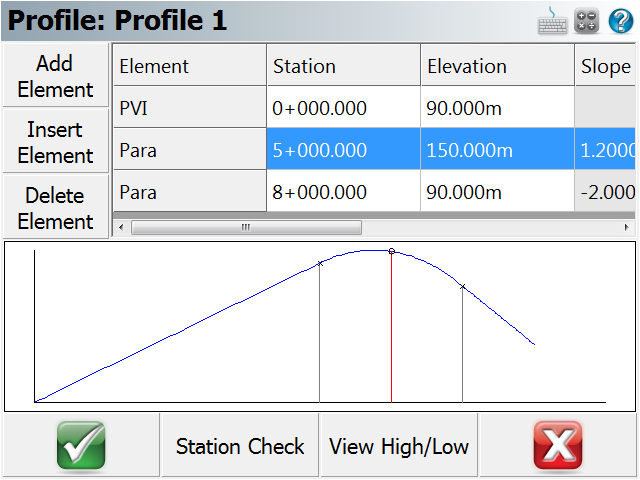
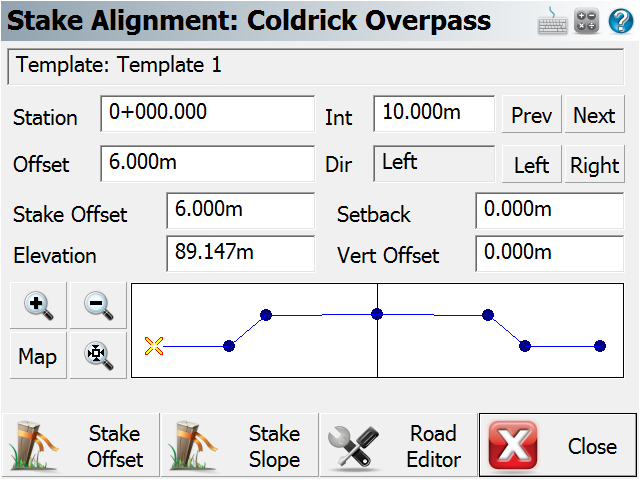
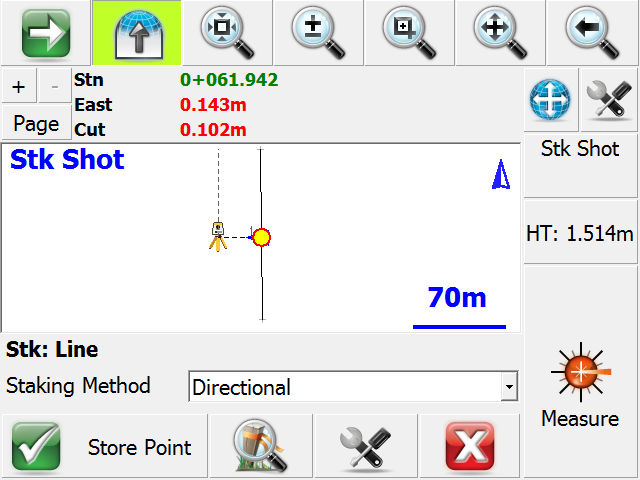
All the staking tools you will ever need
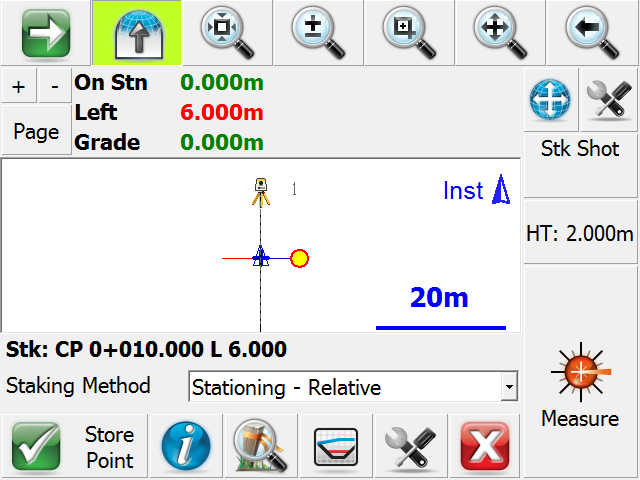
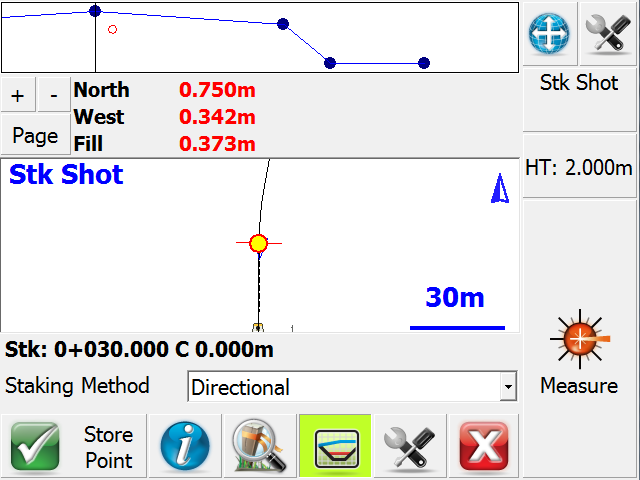
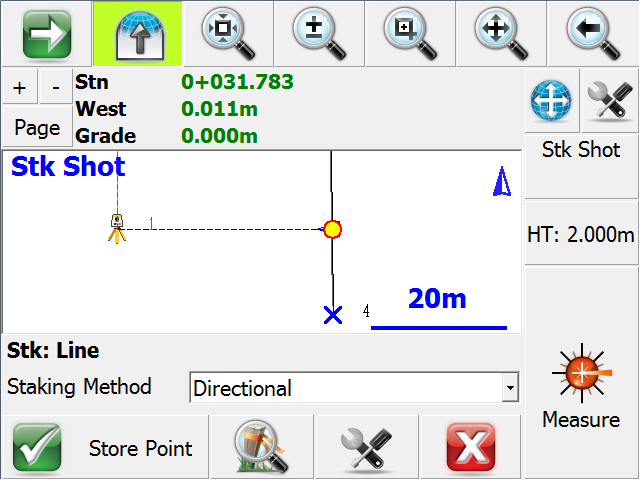
| Staking Lines and arcs with FieldGenius is easy. You will always see where you are in relation to the line or arc. FieldGenius will automatically interpolate the elevation for you so you don’t have to do any manual calculations. |
 |
 |
|
Powerful visualization tools are available to you during alignment staking. See where you are at all times with text notifications and graphic views. |
 |
|
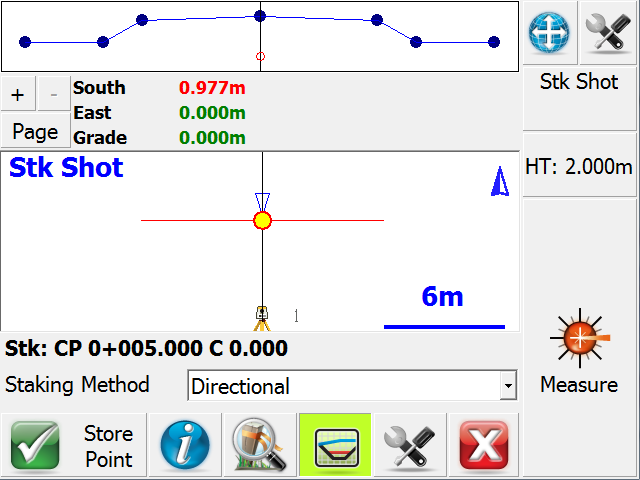
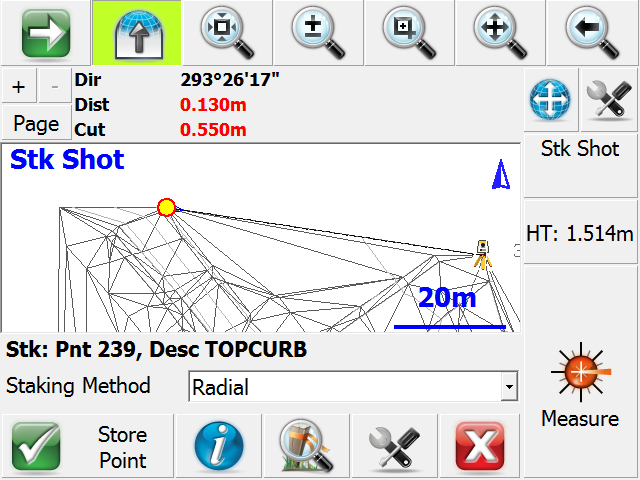
Point stakingcouldn’t be easier with FieldGenius. Instantly see how far you need to move to locate your stake points. |
 |
|
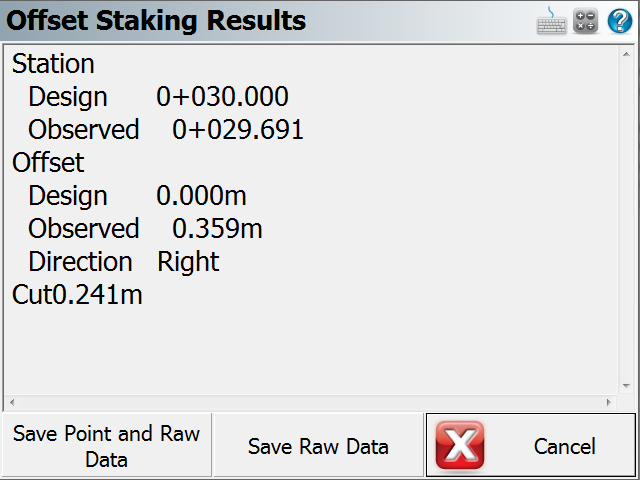
Stake to a DTM and get instant cut and fill values. Import DTM files from LandXML data or directly from your MicroSurvey QSB files. |
 |
The FieldGenius tablet / desktop version helps you work with your FieldGenius projects
| The interface and commands are very similar to the one you use on your data collector so there is virtually no learning curve. | 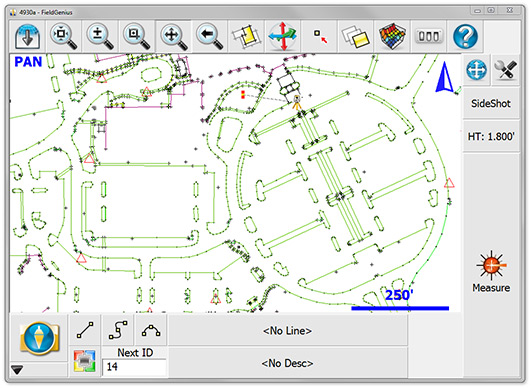 |
|
What kinds of things can you do with the desktop version?
|
 |
It is free to install and use in demo mode and is limited to 30 points. To unlock all the functionality you need to buy the required modules just as you would for the mobile version.
It's Easy to Use
|
The logical options on the screen reflect the time and experience we have with mobile devices. Larger buttons with the ability to change shot modes, target height, next point number, and connectivity options increase productivity. Our simple connectivity system (no coding) is easier to use than any other data collector. If you want to connect your shots, just pick the line button and start taking shots. No predefined code needs to be chosen. |
 |
|
Our simple pop up description list makes it easy to label shots. Multiple lines can be joined at the same time with the same code. |
|
|
Smart Points: In this screen shot, we have just picked a point. A number of logical options are immediately available to you. There is no need to “learn” how to get to staking from the graphics – you just pick the Stake button from the bottom row of the point toolbar. These options make it easier to get started with FieldGenius when compared to other collectors. And they make FieldGenius more productive every hour of every day you use the program. |
 |
|
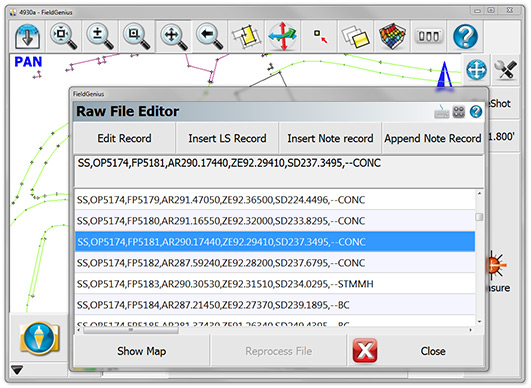
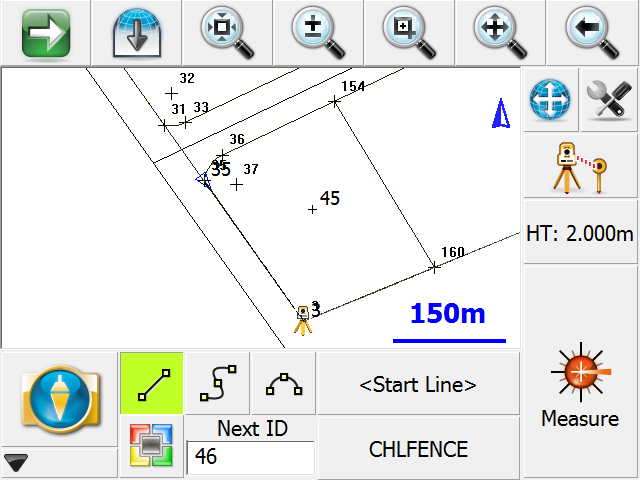
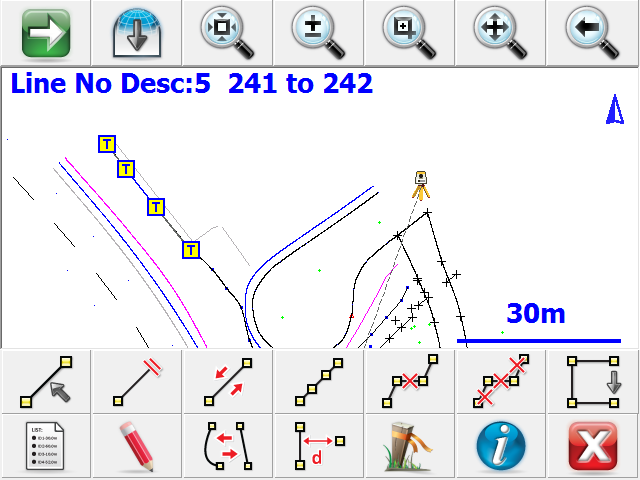
Smart Lines: In this shot, we have just picked a line. The line was imported from a CAD program. Immediate options include staking, listing, & computing ties to points perpendicular to the line. You can even make it a current line so you could start picking up data and add to the line. If you are picking up a string of points, you can reverse the line and continue from the other end. Perpendicular ties are a snap to any point. In the next screen shot, we picked the Info button, and you can see the report on the line. |
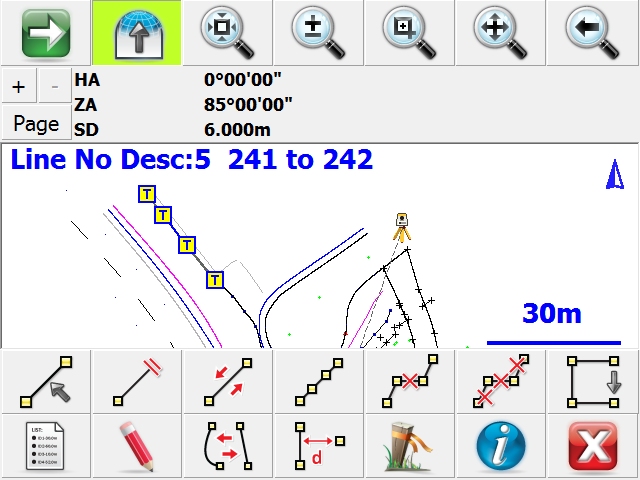 |
|
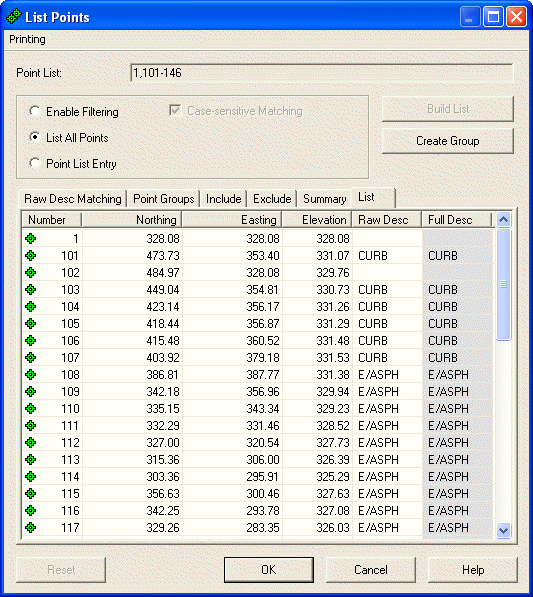
Line information in the scrolling info window: This window will zoom to fill the screen if you tap it so you can read all the info All the information you need on a line is displayed:
|
 |
|
One Tap to Common Options: The large icon on the main work screen takes you to the system menu. FieldGenius has been expanded and improved in many areas. Project options and instrument routines have been completely re-written. We improved every facet of instrument communication and control. |
 |
|
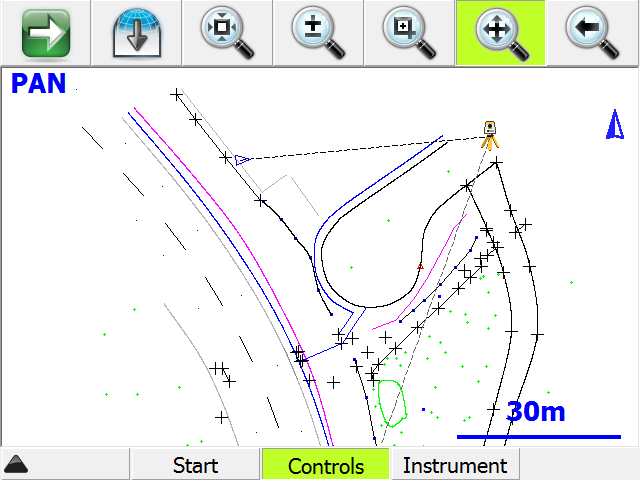
Full Screen Mode for Productivity: In this screen capture, the full screen mode has been toggled on to show the amount of graphics available in FieldGenius. FieldGenius is productive, because you can do more from the graphics screen. You have fewer picks to get around the program. Less time is spent staring at menus and buttons while you are navigating the program. With FieldGenius all the commands you need are at your fingertips. |
 |
Code-free Connectivity
|
MicroSurvey has developed the most simple linework (survey chain) connectivity in the industry. Absolutely NO CODING is required to generate your linework in the field in real time. Other data collection systems force Watch a movie: Here are some of the features that make FieldGenius easier than most data collectors:
|
 |
|
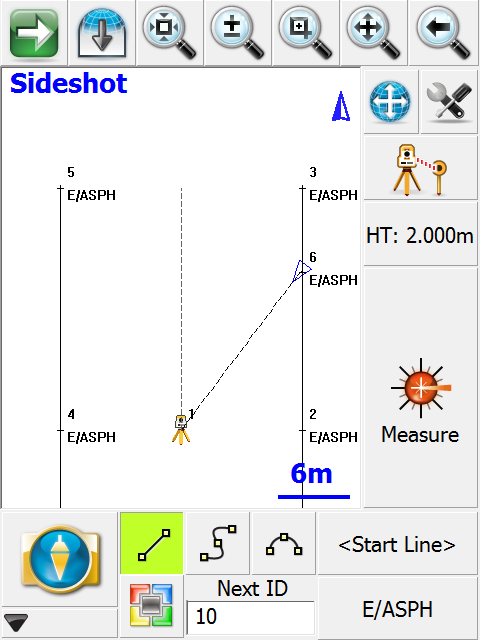
All linework is generated by using one of three draw options, selected from buttons that appear on the main interface:
To start a new line, simply select the desired draw option before you take your measurements. The connection button will display a <Start line> for you. From this point forward, simply continue taking shots to add to the line. Sound simple? It is. You’ll find FieldGenius is, quite simply, the easiest data collector to generate an accurate drawing from shots in the field. |


Painless Data Transfer
|
MicroSurvey has been building software that communicates with data collectors since the ’80s. When we decided to create FieldGenius, one of the top priorities was a smooth transfer of data to the desktop and back. ActiveSync connects the Windows CE device to your desktop (or laptop) computer. We automatically provide communication inside ActiveSync to move your FieldGenius projects between desktop software and the collector. Our new solution, called MicroSurvey Transfer shows you files on your desktop and data collector. Moving files back and forth is done by simply selecting them and pressing the arrow button. There is no need to create a partnership with your device. Options are available to autostart MicroSurvey Transfer when connecting, and to supress the Activesync “Create Partnership” prompt that appears when you dock an unknown device. |
|
Once downloaded, you can manipulate the jobs with a number of different packages. Here are some of your options:
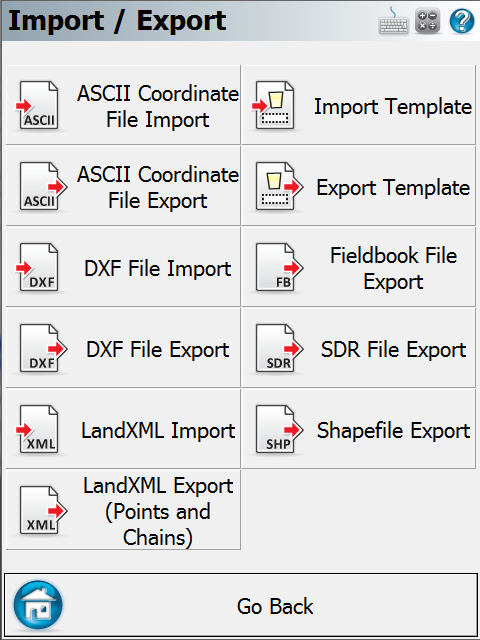
Other painless data transfer options from FieldGenius include our powerful FBK (Autodesk LDD format) file creation capability. Our latest addition to the FieldGenius transfer options is our new stake from DXF capabilities. Just drag a DXF file into FieldGenius and you can import into any job. Pick a line, arc, point, polyline, block, or text in the DXF file and you can immediately coordinate and stake the item. Linework is added to FieldGenius so you can stake with stationing and offsets automatically. It’s painless! |
Advanced Autodesk Land Development Desktop Support
|
With many of our FieldGenius customers using LDD, we decided to add an interface to LDD that is unmatched in the industry. Autodesk’s Survey module for LDD uses FBK files for raw data storage and processing. Now, FieldGenius will directly export an FBK file so you can import directly with Survey. The FieldGenius FBK file contains coordinates, and linework. The linework is imported into LDD as true “figures”. This makes it easy to use these figures in LDD for breaklines or anything you choose! |
 |
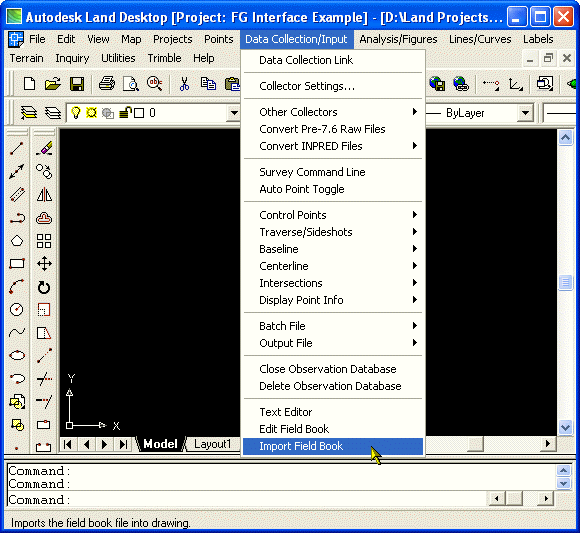
| Once you have exported the FBK file from FieldGenius, just import into LDD: |
 |
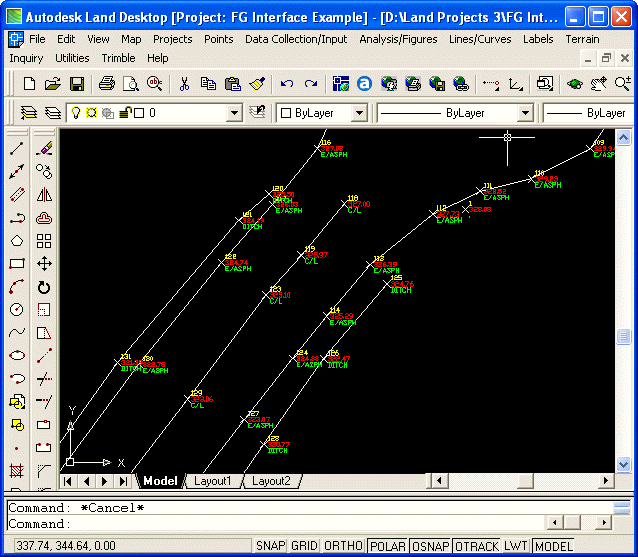
| Select the FBK file, pick Ok, and the program will import the linework and coordinates. This makes it painless to survey in FieldGenius and process using LDD. No other software is required! |
 |
| Here is a point listing from LDD: |
 |
| FieldGenius makes it easy to work with Land Development Desktop workstations! |
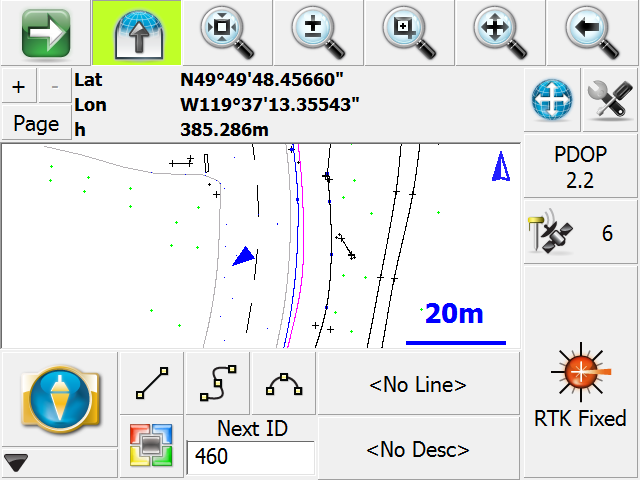
Intelligent Display
|
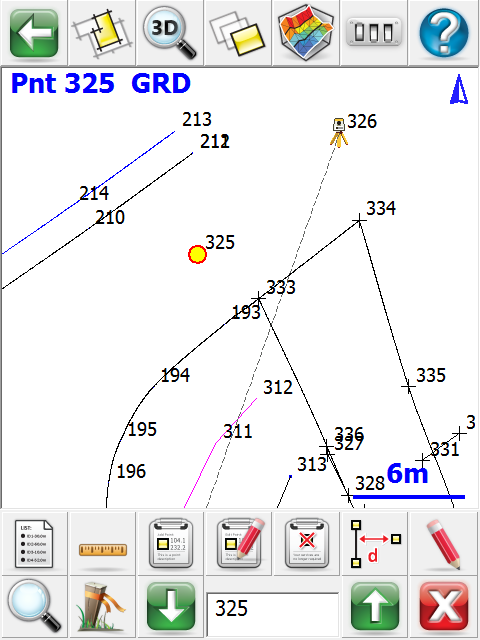
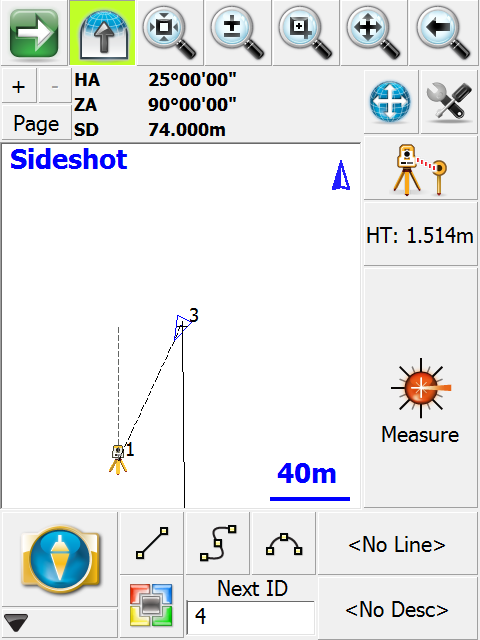
To help you work faster, MicroSurvey introduced with FieldGenius a new scroll window that shows you A dashed line shows the most recent measurement taken. The Triangle shows the location of the prism and the direction back to the instrument. In a robotic instrument, the triangle turns solid when tracking, and it To make it easier for you, we display the next point number and current target height on the screen. |
 |
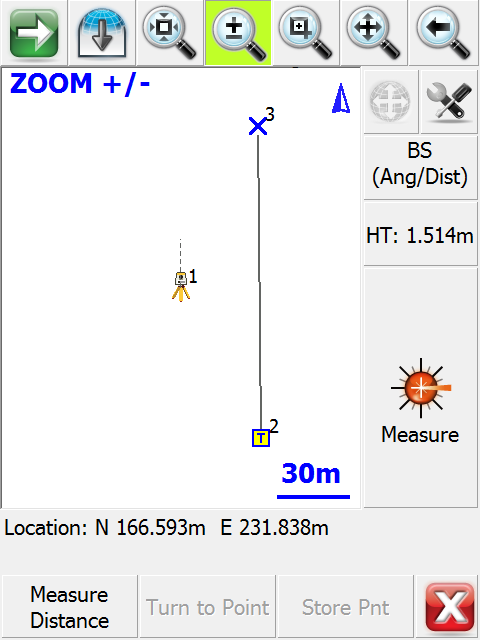
| Current commands are shown in large text at the top of the display window. For example the Zoom Window command shown here: |
 |
| Interested in trying our outstanding Tablet/Desktop Version? The tablet/desktop version supports all the devices, and can be run in portrait (Pocket PC, Recon) or Landscape (Ranger, Recon, Tracker) formats. |
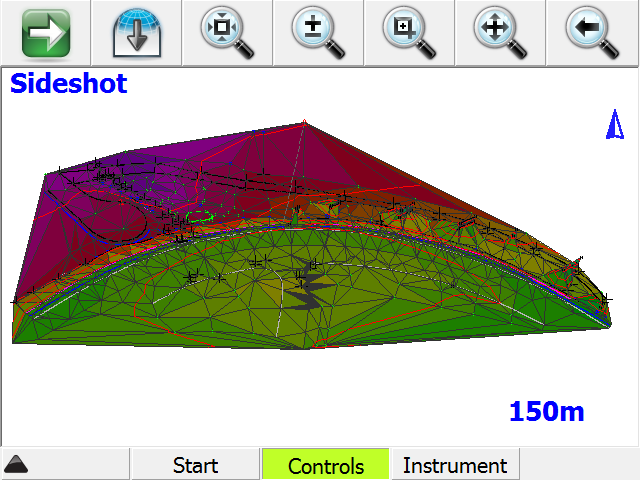
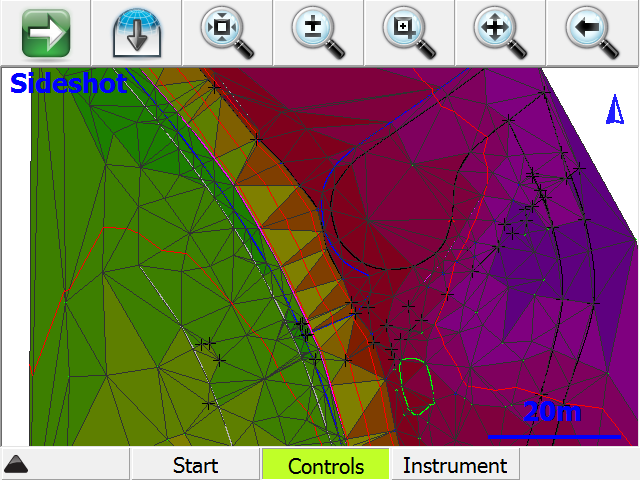
Digital Terrain Modeling, Volumes, Contouring
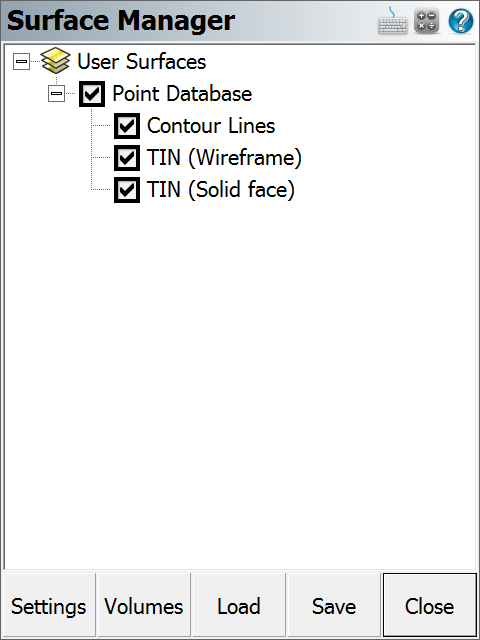
| FieldGenius has the ability to create and utilize DTM surfaces from existing survey data or create a DTM in real time as the data is collected. The TIN and contours will automatically update as each new shot is taken. |
 |
|
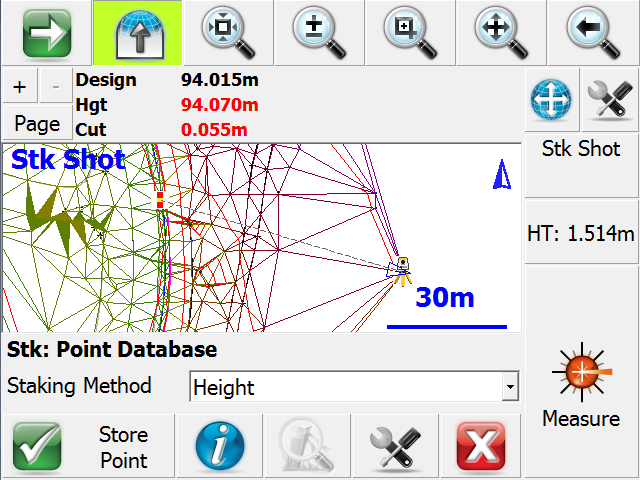
If a DTM surface is present, the user can stake to any point on that surface by simply supplying the N,E location to be staked. There are many methods of selecting the N and E location for staking such as:
|
 |
 |
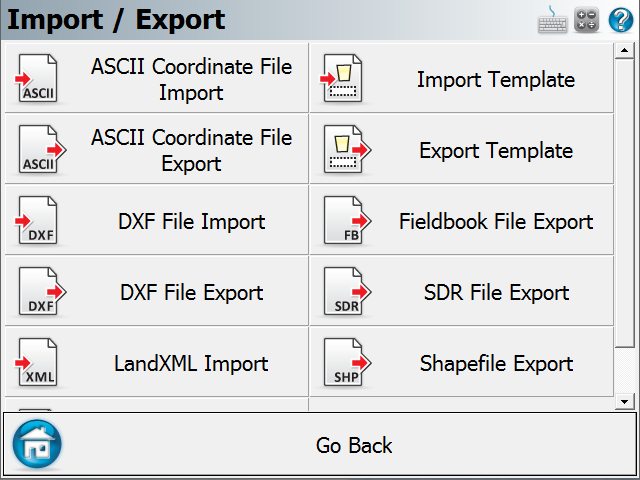
Superior Data Import
| FieldGenius continues MicroSurvey’s history for flexible methods for importing data from other systems. Import LandXML Data FieldGenius contains an XML reader with support for points, lines, arcs, spirals, parcels, surfaces, horizontal alignments, vertical alignments, templates, and cross sections. |
 |
|
LandXML is a common, open data format that describes industry-specific data such as points, parcels, and alignments. Land development professionals worldwide use LandXML to make the data they create more accessible to every project participant. Data can go directly from Land Development Desktop, CAiCE Visual PE, Bentley inRoads, Eagle Point 2002, Trimble TerraModel, or any other software that supports the LandXML schema, to FieldGenius without the need for converting your data. As a result, data can be efficiently transferred and accessible for your project. By utilizing LandXML as our internal data format, FieldGenius not only provides interoperability between different application software, but also between varying versions of that software. Import and Stake Directly from a DXF File Import Control Points Import ASCII Points |
Custom Toolbars
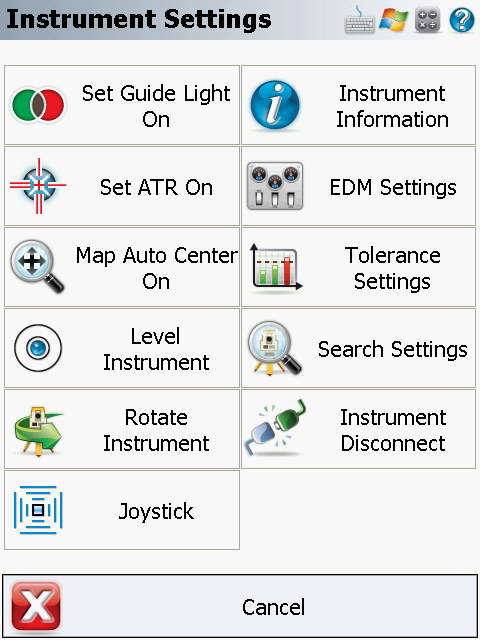
| Custom instrument control toolbars for GPS and robotic total stations are on the main interface, minimizing the need to dig into menus for commonly used toggles and settings. MicroSurvey’s Robotic and GPS support has the most intuitive interface in the industry. All Robotic and GPS settings and functions are easily accessible from their respective control toolbars. FieldGenius has built-in support for all major manufacturer’s robotic total stations and RTK grade GPS systems. |
 |
|
On the GPS toolbar, there are six buttons used to control the settings, and set the display mode for positional information for the GPS positions. The buttons, from top to bottom are as follows:
On the robotic toolbar, there are eight buttons used to control the settings and remotely operate the instrument via the radios:
|
One-Tap measure and Store Shot Functionality
|
To make data collection even simpler, use the Auto-Store method to shoot, record, and draw the point all in one tap. When selected, this will instruct the This method can be very efficient in situations where you are able to select the feature code before measuring. Shown here are some of the shot options available in FieldGenius: |
 |
| Many other options are available by pressing the Next button: |
 |
|
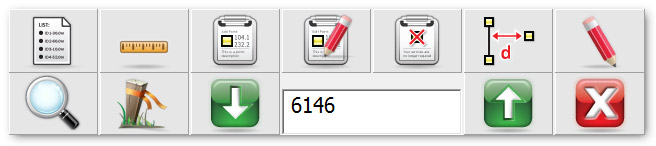
Smart Toolbars: You no longer have to wade through several menus and screens to get access to the functions you use most. MicroSurvey created Smart toolbars to give you quick access to the functions you use all the time. A Smart Toolbar pops up on the bottom of the screen that provides quick access to commonly used functions as you select specific items from your drawing using the stylus. There are Toolbars for points, lines, staking and more. Point Toolbar: Line Toolbar: |

Logical Layout
|
An assortment of tools are available from the FieldGenius start-menu. Access to these tools are optimized for speed and effeciency; reducing the need to ‘dig down’. One tap. Two taps. You’re there. |
Works on more Windows CE hardware models and Windows tablets
New Premium Hardware Solutions Available.
MicroSurvey sells the industry’s most powerful, rugged and reliable data collectors. When battery life and functionality are paramount, we choose only the best data collectors available.
MicroSurvey DC5. A reliable and feature-packed data collector at an astounding price. The DC5 picks up where the DC4 left off; adding a faster processor, a 9-pin serial port, and more storage space.
Mesa 2 Introducing… your new office. In a sleek package with the highest-rated protection against water and dust, the Mesa 2 Rugged Tablet can go with you into the harshest environments out there. Running Windows 10, the new Mesa 2 brings powerful functionality to your mobile data collection, featuring a large, 7-inch, extra-bright display for easily viewing maps or images, all-day battery power lasting up to 15 hours, and of course, the unmatched ruggedness that Juniper Systems is known for.
Archer 2 by Juniper Systems is rugged, powerful, and versatile to handle your most demanding needs. It meets IP67 and Mil-Std-810F standards for drop, vibration, immersion, humidity, and operating temperatures. From a fantastic, and trustworthy brand.
 |
||
 |
||


Quick Links
[wbcr_php_snippet id="221056"]
About Us
About Us
© 2019 MicroSurvey Software Inc. All rights reserved